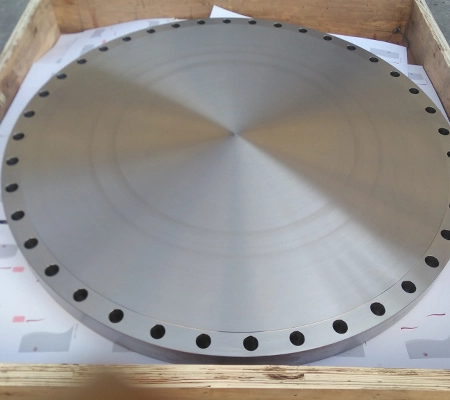
ASTM A182/A240 ASME B16.47 Large diameter steel flange, specification: 26 "-60" A series/B series, pressure rating: 75LB-900LB; Suitable for liquid, particle, and gas transportation pipelines, such as chemical, refining, boilers, electricity, food, offshore platforms, and other fields.
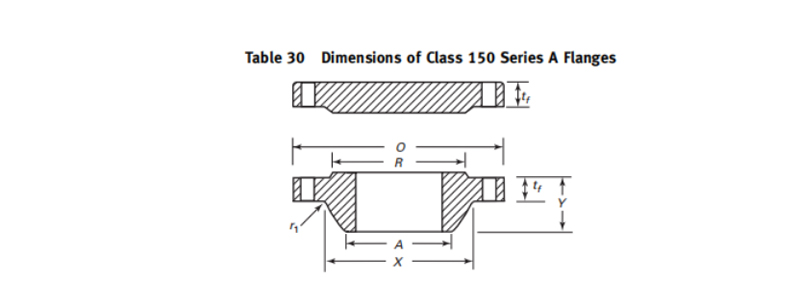
| Nominal Pipe Size | 0.D. of Flange, O | Minimum Thickness of Flange, tf[Note (1)] | Length Through Hub, Y | Diam. of Hub, X [Note (2)] | Hub Diam. Top, A [Note(3)] | Raised Face Diam. R | Drilling | Diam. of Bolt, in. | Minimum Fillet Radius, r1 | |||
| WNF | Blind | Diam. of Bolt Circle | No. of Bolt Holes | Diam. of Bolt Hole, in. | ||||||||
| 26 | 870 | 66.7 | 66.7 | 119 | 676 | 660.4 | 749 | 806.4 | 24 | 1, 3/8 | 1¼ | 10 |
| 28 | 925 | 69.9 | 69.9 | 124 | 727 | 711.2 | 800 | 863.6 | 28 | 1, 3/8 | 1¼ | 11 |
| 30 | 985 | 73.1 | 73.1 | 135 | 781 | 762.0 | 857 | 914.4 | 28 | 1, 3/8 | 1¼ | 11 |
| 32 | 1060 | 79.4 | 79.4 | 143 | 832 | 812.8 | 914 | 977.9 | 28 | 1, 5/8 | 1½ | 11 |
| 34 | 1110 | 81.0 | 81.0 | 148 | 883 | 863.6 | 965 | 1028.7 | 32 | 1, 5/8 | 1½ | 13 |
| 36 | 1170 | 88.9 | 88.9 | 156 | 933 | 914.4 | 1022 | 1085.8 | 32 | 1, 5/8 | 1½ | 13 |
| 38 | 1240 | 85.8 | 85.8 | 156 | 991 | 965.2 | 1073 | 1149.4 | 32 | 1, 5/8 | 1½ | 13 |
| 40 | 1290 | 88.9 | 88.9 | 162 | 1 041 | 1016.0 | 1124 | 1200.2 | 36 | 1, 5/8 | 1½ | 13 |
| 42 | 1345 | 95.3 | 95.3 | 170 | 1 092 | 1066.8 | 1194 | 1257.3 | 36 | 1, 5/8 | 1½ | 13 |
| 44 | 1405 | 100.1 | 100.1 | 176 | 1143 | 1117.6 | 1245 | 1314.4 | 40 | 1, 5/8 | 1½ | 13 |
| 46 | 1455 | 101.6 | 101.6 | 184 | 1 197 | 1168.4 | 1295 | 1365.2 | 40 | 1, 5/8 | 1½ | 13 |
| 48 | 1510 | 106.4 | 106.4 | 191 | 1248 | 1219.2 | 1359 | 1422.4 | 44 | 1, 5/8 | 1½ | 13 |
| 50 | 1570 | 109.6 | 109.6 | 202 | 1 302 | 1270.0 | 1410 | 1479.6 | 44 | 1, 7/8 | 1¾ | 13 |
| 52 | 1625 | 114.3 | 114.3 | 208 | 1 353 | 1320.8 | 1461 | 1536.7 | 44 | 1, 7/8 | 1¾ | 13 |
| 54 | 1685 | 119.1 | 119.1 | 214 | 1 403 | 1371.6 | 1511 | 1593.8 | 44 | 1, 7/8 | 1¾ | 13 |
| 56 | 1745 | 122.3 | 122.3 | 227 | 1 457 | 1422.4 | 1575 | 1651.0 | 48 | 1, 7/8 | 1¾ | 13 |
| 58 | 1805 | 127.0 | 127.0 | 233 | 1 508 | 1473.2 | 1626 | 1708.2 | 48 | 1, 7/8 | 1¾ | 13 |
| 60 | 1855 | 130.2 | 130.2 | 238 | 1559 | 1524.0 | 1676 | 1759.0 | 52 | 1, 7/8 | 1¾ | 13 |
GENERAL NOTES:
(a) Dimensions are in millimeters.
(b) For tolerances, see section 7.
(c) For facings, see para. 6.1.
(d) For flange bolt holes, see para. 6.2.
(e) For spot facing, see para. 6.3.
(f)The bore is to be specified by the purchaser. Tolerances in para. 7.3.2 apply.
(g) Blind flanges may be made with or without hubs at the manufacturer's option.
NOTES:
(1) The minimum flange thickness does not include the raised face thickness (see para. 6.1.1).
(2) This dimension is for the large end of hub, which may be straight or tapered.
(3) For welding and bevel, see para. 6.4.
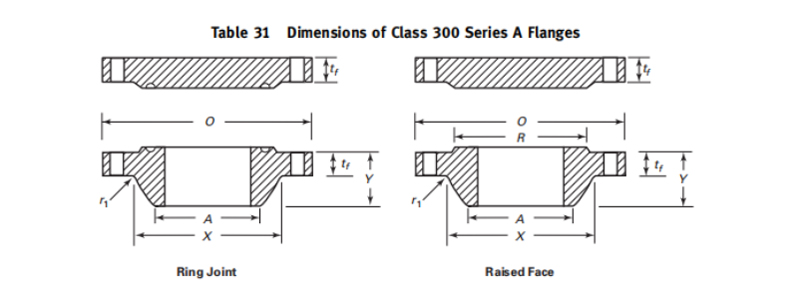
| Nominal Pipe Size | 0.D. of Flange, O | Minimum Thickness of Flange, tf [Note (1)] | Length Through Hub, Y | Diam. of Hub, X [Note (2)] | Hub Diam. Top, A [Note(3)] | Raised Face Diam.. R | Drilling | Diam. of Bolt, in. | Minimum Fillet Radius, r1 | |||
| WNF | Blind | Diam. of Bolt Circle | No. of Bolt Holes | Diam. of Bolt Hole, in. | ||||||||
| 26 | 970 | 77.8 | 82.6 | 183 | 721 | 660.4 | 749 | 876.3 | 28 | 1¾ | 1, 5/8 | 10 |
| 28 | 1035 | 84.2 | 88.9 | 195 | 775 | 711.2 | 800 | 939.8 | 28 | 1¾ | 1, 5/8 | 11 |
| 30 | 1090 | 90.5 | 93.7 | 208 | 827 | 762.0 | 857 | 997.0 | 28 | 1, 7/8 | 1¾ | 11 |
| 32 | 1150 | 96.9 | 98.5 | 221 | 881 | 812.8 | 914 | 1054.1 | 28 | 2 | 1, 7/8 | 11 |
| 34 | 1205 | 100.1 | 103.2 | 230 | 937 | 863.6 | 965 | 1104.9 | 28 | 2 | 1, 7/8 | 13 |
| 36 | 1270 | 103.2 | 109.6 | 240 | 991 | 914.4 | 1022 | 1168.4 | 32 | 2, 1/8 | 2 | 13 |
| 38 | 1170 | 106.4 | 106.4 | 179 | 994 | 965.2 | 1029 | 1092.2 | 32 | 1, 5/8 | 1½ | 13 |
| 40 | 1240 | 112.8 | 112.8 | 192 | 1048 | 1016.0 | 1086 | 1155.7 | 32 | 1¾ | 1, 5/8 | 13 |
| 42 | 1290 | 117.5 | 117.5 | 198 | 1099 | 1066.8 | 1137 | 1206.5 | 32 | 1¾ | 1, 5/8 | 13 |
| 44 | 1355 | 122.3 | 122.3 | 205 | 1149 | 1117.6 | 1194 | 1263.6 | 32 | 1, 7/8 | 1¾ | 13 |
| 46 | 1415 | 127.0 | 127.0 | 214 | 1203 | 1168.4 | 1245 | 1320.8 | 28 | 2 | 1, 7/8 | 13 |
| 48 | 1465 | 131.8 | 131.8 | 222 | 1254 | 1219.2 | 1302 | 1371.6 | 32 | 2 | 1, 7/8 | 13 |
| 50 | 1530 | 138.2 | 138.2 | 230 | 1 305 | 1270.0 | 1359 | 1428.8 | 32 | 2, 1/8 | 2 | 13 |
| 52 | 1580 | 142.9 | 142.9 | 237 | 1356 | 1320.8 | 1410 | 1479.6 | 32 | 2, 1/8 | 2 | 13 |
| 54 | 1660 | 150.9 | 150.9 | 251 | 1410 | 1371.6 | 1467 | 1549.4 | 28 | 2, 3/8 | 2¼ | 13 |
| 56 | 1710 | 152.4 | 152.4 | 259 | 1464 | 1422.4 | 1518 | 1600.2 | 28 | 2, 3/8 | 2¼ | 13 |
| 58 | 1760 | 157.2 | 157.2 | 265 | 1514 | 1473.2 | 1575 | 1651.0 | 32 | 2, 3/8 | 2¼ | 13 |
| 60 | 1810 | 162.0 | 162.0 | 271 | 1565 | 1524.0 | 1626 | 1701.8 | 32 | 2, 3/8 | 2¼ | 13 |
GENERAL NOTES:
(a) Dimensions are in millimeters.
(b) For tolerances, see section 7.
(c) Forfacings, see para. 6.1.
(d) For flange bolt holes, see para. 6.2.
(e) For spot facing, see para. 6.3.
(f) The bore is to be specified by the purchaser. Tolerances in para. 7.3.2 apply.
(g) Blind flanges may be made with or without hubs at the manufacturer's option.
NOTES:
(1) The minimum flange thickness does not include the raised face thickness (see para. 6.1.1).
(2) This dimension is for the large end of hub, which may be straight or tapered.
(3) Forwelding and bevel, see para. 6.4.
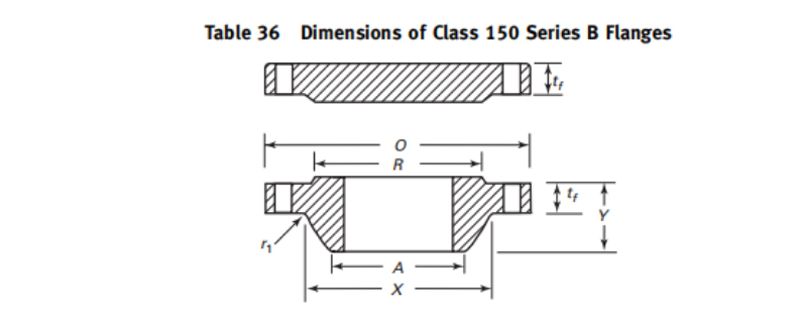
| Nominal Pipe Size | 0.D. of Flange, O | Minimum Thickness of Flange, tf [Note (1)] | Length Through Hub, Y | Diam. of Hub, X [Note (2)] | Hub Diam. Top, A [Note(3)] | Raised Face Diam.. R | Drilling | Diam. of Bolt, in. | Minimum Fillet Radius, r1 | |||
| WNF | Blind | Diam. of Bolt Circle | No. of Bolt Holes | Diam. of Bolt Hole, in. | ||||||||
| 26 | 785 | 39.8 | 43.0 | 87 | 684 | 661.9 | 711 | 744.5 | 36 | 7/8 | ¾ | 10 |
| 28 | 835 | 43.0 | 46.2 | 94 | 735 | 712.7 | 762 | 795.3 | 40 | 7/8 | ¾ | 10 |
| 30 | 885 | 43.0 | 49.3 | 98 | 787 | 763.5 | 813 | 846.1 | 44 | 7/8 | ¾ | 10 |
| 32 | 940 | 44.6 | 52.5 | 106 | 840 | 814.3 | 864 | 900.1 | 48 | 7/8 | ¾ | 10 |
| 34 | 1005 | 47.7 | 55.7 | 109 | 892 | 865.1 | 921 | 957.3 | 40 | 1 | 7/8 | 10 |
| 36 | 1055 | 50.9 | 57.3 | 116 | 945 | 915.9 | 972 | 1009.6 | 44 | 1 | 7/8 | 10 |
| 38 | 1125 | 52.5 | 62.0 | 122 | 997 | 968.2 | 1022 | 1070.0 | 40 | 1, 1/8 | 1 | 10 |
| 40 | 1175 | 54.1 | 65.2 | 127 | 1049 | 1 019.0 | 1 080 | 1120.8 | 44 | 1, 1/8 | 1 | 10 |
| 42 | 1225 | 57.3 | 66.8 | 132 | 1 102 | 1 069.8 | 1130 | 1171.6 | 48 | 1, 1/8 | 1 | 11 |
| 44 | 1275 | 58.9 | 70.0 | 135 | 1153 | 1 120.6 | 1181 | 1222.4 | 52 | 1, 1/8 | 1 | 11 |
| 46 | 1340 | 60.4 | 73.1 | 143 | 1 205 | 1 171.4 | 1235 | 1284.3 | 40 | 1, 1/4 | 1, 1/8 | 11 |
| 48 | 1390 | 63.6 | 76.3 | 148 | 1 257 | 1 222.2 | 1 289 | 1335.1 | 44 | 1, 1/4 | 1, 1/8 | 11 |
| 50 | 1445 | 66.8 | 79.5 | 152 | 1308 | 1 273.0 | 1 340 | 1385.9 | 48 | 1, 1/4 | 1, 1/8 | 11 |
| 52 | 1495 | 68.4 | 82.7 | 156 | 1360 | 1323.8 | 1391 | 1436.7 | 52 | 1, 1/4 | 1, 1/8 | 11 |
| 54 | 1550 | 70.0 | 85.8 | 160 | 1413 | 1 374.6 | 1441 | 1492.2 | 56 | 1, 1/4 | 1, 1/8 | 11 |
| 56 | 1600 | 71.6 | 89.0 | 165 | 1465 | 1425.4 | 1492 | 1543.0 | 60 | 1, 1/4 | 1, 1/8 | 14 |
| 58 | 1675 | 73.1 | 91.9 | 173 | 1516 | 1476.2 | 1 543 | 1611.3 | 48 | 1, 3/8 | 1¼ | 14 |
| 60 | 1725 | 74.7 | 95.4 | 178 | 1570 | 1527.0 | 1 600 | 1662.1 | 52 | 1, 3/8 | 1¼ | 14 |
GENERAL NOTES:
(a) Dimensions are in millimeters.
(b) For tolerances, see section 7.
(c) For facings, see para.6.1.
(d) For flange bolt holes, see para. 6.2.
(e) For spot facing, see para. 6.3.
(f) The bore is to be specified by the purchaser. Tolerances in para. 7.3.2 apply.
(g) Blind flanges may be made with or without hubs at the manufacturer's option.
NOTES:
(1) The minimum flange thickness does not include the raised face thickness (see para. 6.1.1).
(2) This dimension is for the large end of hub, which may be straight or tapered.
(3) For welding and bevel, see para. 6.4.
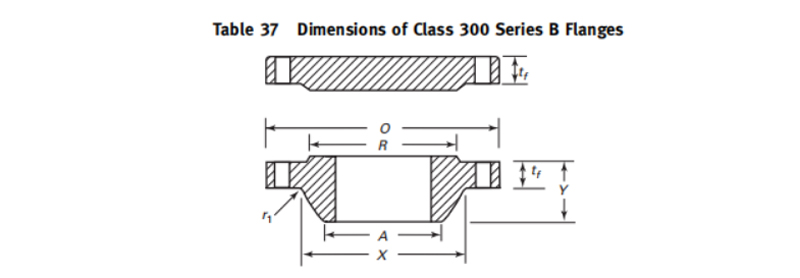
| Nominal Pipe Size | O.D. of Flange, O | Minimum Thickness of Flange, tf [Note (1)] | Length Through Hub, Y | Diam. of Hub, X [Note (2)] | Hub Diam. Top, A [Note(3)] | Raised Face Diam.. R | Drilling | Diam. of Bolt, in. | Minimum Fillet Radius, r1 | |||
| WNF | Blind | Diam. of Bolt Circle | No. of Bolt Holes | Diam. of Bolt Hole, in. | ||||||||
| 26 | 865 | 87.4 | 87.4 | 168 | 702 | 665.2 | 737 | 803.3 | 32 | 1, 3/8 | 1¼ | 14 |
| 28 | 920 | 87.4 | 87.4 | 148 | 756 | 716.0 | 787 | 8572 | 36 | 1, 3/8 | 1¼ | 14 |
| 30 | 990 | 92.1 | 92.1 | 156 | 813 | 768.4 | 845 | 920.8 | 36 | 1½ | 1, 3/8 | 14 |
| 32 | 1055 | 101.6 | 101.6 | 167 | 864 | 819.2 | 902 | 9779 | 32 | 1, 5/8 | 1½ | 16 |
| 34 | 1110 | 101.6 | 101.6 | 171 | 918 | 870.0 | 953 | 10319 | 36 | 1, 5/8 | 1½ | 16 |
| 36 | 1170 | 101.6 | 101.6 | 179 | 965 | 920.8 | 1010 | 1089.0 | 32 | 1¾ | 1, 5/8 | 16 |
| 38 | 1220 | 109.6 | 109.6 | 165 | 1016 | 971.6 | 1060 | 1139.8 | 36 | 1¾ | 1, 5/8 | 16 |
| 40 | 1275 | 114.3 | 114.3 | 197 | 1 067 | 1022.4 | 1114 | 1190.6 | 40 | 1¾ | 1, 5/8 | 16 |
| 42 | 1335 | 117.5 | 117.5 | 203 | 1118 | 1074.7 | 1168 | 1244.6 | 36 | 1, 7/8 | 1, 3/4 | 16 |
| 44 | 1385 | 125.5 | 125.5 | 213 | 1173 | 1125.5 | 1219 | 1 2954 | 40 | 1, 7/8 | 1, 3/4 | 16 |
| 46 | 1460 | 127.0 | 128.6 | 221 | 1229 | 1176.3 | 1270 | 1365.2 | 36 | 2 | 1, 7/8 | 16 |
| 48 | 1510 | 127.0 | 133.4 | 222 | 1278 | 1227.1 | 1327 | 1416.0 | 40 | 2 | 1, 7/8 | 16 |
| 50 | 1560 | 136.6 | 138.2 | 233 | 1330 | 1277.9 | 1378 | 1466.8 | 44 | 2 | 1, 7/8 | 16 |
| 52 | 1615 | 141.3 | 142.6 | 241 | 1383 | 1328.7 | 1429 | 1517.6 | 48 | 2 | 1, 7/8 | 16 |
| 54 | 1675 | 135.0 | 147.7 | 238 | 1435 | 1379.5 | 1480 | 1578.0 | 48 | 2 | 1, 7/8 | 16 |
| 56 | 1765 | 152.4 | 155.4 | 267 | 1494 | 1430.3 | 1537 | 1651.0 | 36 | 2, 3/8 | 2¼ | 17 |
| 58 | 1825 | 152.4 | 160.4 | 273 | 1548 | 1481.1 | 1594 | 17129 | 40 | 2, 3/8 | 2¼ | 17 |
| 60 | 1880 | 149.3 | 165.1 | 270 | 1599 | 1557.3 | 1651 | 1763.7 | 40 | 2, 3/8 | 2¼ | 17 |
GENERAL NOTES:
(a) Dimensions are in millimeters.
(b) For tolerances, see section 7.
(c) Forfacings. see para.6.1.
(d) For flange bolt holes, see para. 6.2.
(e) For spot facing, see para. 6.3.
(f) The bore is to be specified by the purchaser. Tolerances in para. 7.3.2 apply.
(g) Blind fanges may be made with or without hubs at the manufacturer's option
NOTES:
(1) The minimum flange thickness does not include the raised face thickness (see para. 6.1.1).
(2) This dimension is for the large end of hub, which may be straight or tapered.
(3) For welding and bevel, see para. 6.4.
KIDY is a service-oriented enterprise with a complete range of steel grades; Conventional steel grades F304/304L, F321, F316/316L, and other material specifications are available for long-term flange blanks for quick delivery. The packaging is in export wooden boxes, and special size requirements can be customized.

Customer Satisfaction Is Our Honor. Feel free to enquiry us any questions of pipeline materials.


